

I am a late blooming artist who daily is amazed that I can do art. Until the age of 54 I believed I had no art talent. For years I heard in my head the long-ago elementary school art teacher criticizing my drawings of trees. “You are not drawing that right.” “Can’t you follow directions?”
Now I play with art rather than stressing out that my art is not good enough. I am having fun with crayons, paints, pastels, stamps, pencils and stacks and stacks of paper and canvases.
I resisted doing watercolors for several years, thinking they were too washed out or too hard to use. Then I walked into a class on Art Journaling taught by Lisia Farley. You can learn more about her at Lisia’s website
This energetic, creative, multitalented artist inspired me to give watercolors a new try. I wish I had her in elementary school.
In this post I am including some of the watercolor techniques you can use in your art journal. Many are ones I learned from Lisia. A few others I found in books and on the web. I will post more in a future blog.
Every time I learn a new art technique, I put it in my ART IDEA Journal. The pages often are messy with scribbled ideas and splashes of color.

WET OR DRY OR BOTH?
 Experiment to see what your colors do on wet or on dry paper. Similarly, you can layer wet paint on dry paint, wet on wet paint or add water. If you don’t feel creative to do a picture, it is fun to experiment in your ART IDEA book to see how watercolors interact with each other.
LAYERING COLOR ON WET PAPER
 Wet an area of the paper with water. Add one color and let it run and pool in the water. Add more colors to the wet page.
ADDING DROPS OF WATER ON A LINE OF PAINT
 Collect paint on your brush and draw a line or shape on dry paper. Go back in and add drops of clean water on the edges of the line or shapes to blur and soften the lines. Let them dry naturally so that the paint can move in the water dops.
DRAG, DROP AND BLEND.
 Gather lots of color on your brush and drag the paint to the left or right on the paper so it blends with other colors. Add drops of clear water so that the two colors blend together. In this one I used different shades of blue and white, dragging one color into the other.
POOLING THE PAINT
Watercolors have a life of their own when you add “barriers” around which the paint can pool and move. Lay down a wash of very wet and thick paint on dry paper. Immediately add you pooling materials: saran wrap, crunched wax paper, salt, rice, cornmeal etc. Leave the items to dry naturally or with a gentle hairdryer.


A DAB OF ALCOHOL OR LEMON JUICE

CREATING WRITING AREAS
Laying down strips of painters’ or artists’ tape, you can make spaces for drawings or writing. You paint over and around the tape. let dry and then remove to reveal white areas. 


LINES AND DESIGNS
You can certainly paint lines and designs. With watercolors you have the option to create designs through pulling, removing, scratching, dabbing, wax undercoats and more.


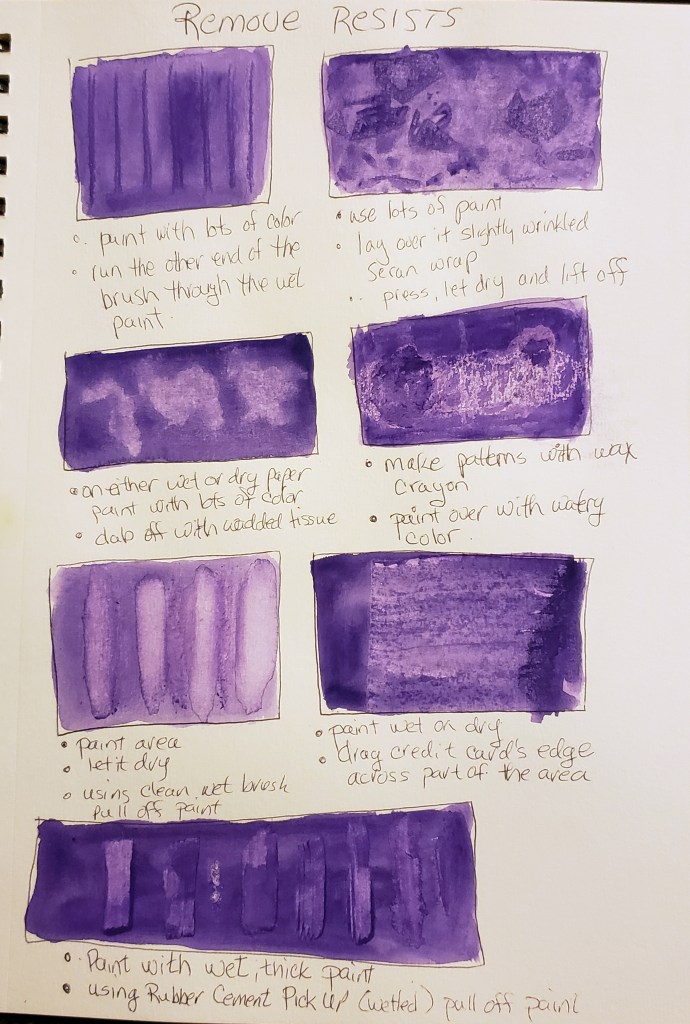
REMOVE OR RESIST
There are several ways to remove paint so that you leave a design in the remaining paint.
1. Sponge off with Kleenex or crinkled saran wrap.
2. Use a rubber eraser or homemade ball of rubber cement to pull off paint by dabbing or dragging.
3. Use a clean wet art brush to pull off paint that has dried.
4. Drag a credit card edge across a painted area to create a texture.
5. Make a pattern with wax crayons and paint over the design.
6. Drag the wood end of a brush through the paint on the page to pull the paint into lines.
PLAYING WITH COLOR
On the days I feel less than creative I experiment with color. I mix watercolors,testing shades and hues. I layer color to create depth of color. I make color schemes to see what goes well together.

ON THE RIGHT ARE “DROPLETS” FOR HIGHLIGHTING VARIOUS DEPTHS OF COLOR

YOU CAN DO THE SAME THING BY ADDING MORE AND MORE BLUE TO A COLOR.

MORE TECHNIQUES TO COME IN THE NEXT POST
AND REMEMEBR…. HAVE FUN!
DIRECTORY OF POSTS ON THIS SITE
